
10 Common Types of Cross-Section Can Double Seam Defects
In the can double seaming industry, there are a lot of problems a packager needs to deal with. Among these problems are seam defects that occur after the double seaming process. There are visual double seam defects that you can see through visual inspection only. But in today’s topic, we will dive into cross-section can double seam defects.
You can only detect a cross-section double seam defect after you cut a double seam into three separate sections around the seamed can’s periphery. A computerized monitor, seam scope, or seam projector is then used to view this cross-section. It is further magnified to picture any defects on the double seam. In today’s discussion, we are going to talk about the 10 common types of cross-section double seam defects in cans that can be easily seen through the said method.
Without further ado, let us begin with our topic for today.
#1 Body Wall Fracture
You can see this defect using a seam scope. You will find a broken body wall opposite the double seam’s pressure ridge – an impression found inside the can body’s double seam area. This condition happens when the second seam roll operation forces the cover’s curl into the can body, causing the seam to break. A body wall fracture is more common in plastic bowls having aluminum covers and aluminum cans in the beverage industry.
#2 Compound Squeezing
Compound squeezing happens when the seaming process forces the lining compound to the seam’s bottom section between the cover hook and can body. You can usually see this defect all over the can’s double seam.
Moreover, you can detect a compound squeezing defect using a seam scope or seam projector. You can see it on the interior diameter between a cover and can body. This defect is usually caused by a very tight second seam roll operation.
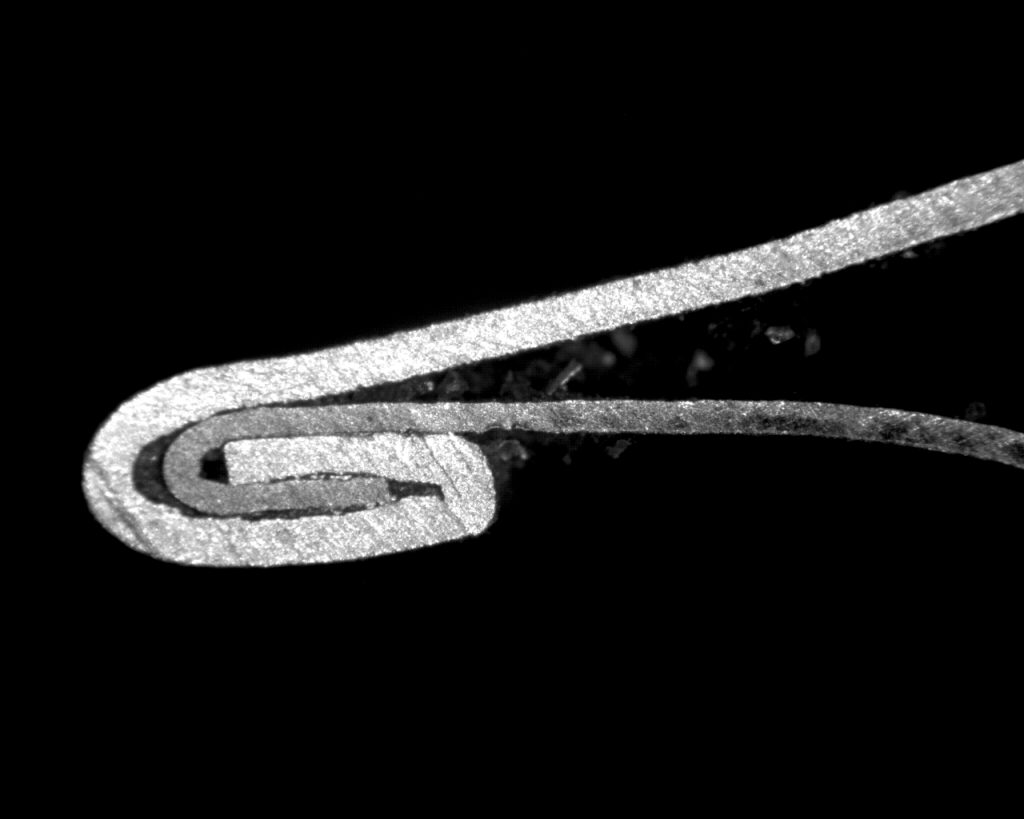
#3 Hairpins
These defects are also called R-ing or R’s. The cross-section of the cut seam will show a body hook that is shaped like an ‘R’. When the cut cross-section is magnified under a seam projector or scope, you will see a definite similarity to an ‘R’.
#4 Long Body Hook
This is a condition in which the seamed hook of the can body has too much material. You can easily observe or determine this defect by disassembling the seam. When you are not able to correct this condition, leaks can happen which can cause the packaged product to spoil.
#5 Short Body Hook
This condition is caused by too little material present in the can body’s hook for forming the seam. Like the long body hook, you can also easily observe this by disassembling the seam.
Furthermore, this defect can be caused by inadequate spring pressure from the lower chuck due to damages. It can also be because of can bodies that are under flanged or due to a huge distance between the lower chuck plate and seaming chuck.
#6 Long Cover Hook
This defect is characterized by an extended cover hook. It can be caused by the following:
- Too tight 1st seam roll operation.
- Too narrow groove profile of the 1st seaming roller.
- Too large cutting edge diameter of the cover.
- Short Can body hook.
#7 Short Cover Hook
The cover hook is formed during the first roller operation of the seaming process. A short cover hook can result from a too deep first roller operation. This causes the flange of the cover to be curled too much into the seam which reduces the seam’s length.
#8 Long Seam Width
A long seam width is caused by excessive pressure from the second seaming roller operation. This excessive pressure produces unacceptable seams and may cause the following to happen:
- An increased seam width
- Reduction or unhooking of the cover and can body overlap.
- Leaks that result in product spoilage.
#9 Short Seam Width
When you view a short seam width using a seam projector, you will notice loose metal layers. The structure of the material’s five layers compared to the seam’s actual thickness will have different measurements. This kind of seam can cause leaks because the metal folds are not tightly compressed enough together. Thus, not allowing the sealing compound to fill in the voids.
#10 Seam Bumps
These defects form when the lining compound is distributed unevenly. They occur in the double seams of butt-welded can bodies rather than soldered and lapped over. The compound will flow around during the second roller operation like a wave that stops in a single spot once the roller retreats from the container.
Conclusion
Like any other kind of double seam can defects, you can prevent cross-section seam defects from occurring by using a can seaming machine tailored to your exact needs.
With a customized can sealer, it can be ensured that you will get a machine that fits your can and lid types. So make sure that you know how to choose the right packaging machine manufacturer for your application. You are free to check out LPE’s can sealer machines if you are looking for customizable and affordable machines.